Next: Motors Up: Beamline Specific Code by Previous: Entry Widgets Contents Index
Here it is demonstrated how check- and select-buttons are used:
$Spc::res_h{ blsc} = "k428";
$Spc::res_h{ k428_title} = { text => "Keithley-428"};
foreach my $i ( qw( 10 11 12))
{
    $Spc::res_h{ "k428_io" . $i} =
      {
        label => { name => "K428-$i",
                   get => sub { get_K428( $i, "R");}},
        checkbutton => { name => "Zero check",
                         set_on => sub { set_K428( $i, "C1X");},
                         set_off => sub { set_K428( $i, "C0X");},
                         get => sub { get_K428( $i, "C") =~ /C1/i;}},
        selectbutton => { name => "Range",
                          items => {"R6", sub { set_K428( $i, "R6X");},
                                    "R7", sub { set_K428( $i, "R7X");},
                                    "R8", sub { set_K428( $i, "R8X");},
                                    "R9", sub { set_K428( $i, "R9X");}}}};
}
#
# the callback functions
#
sub get_K428
{
    my ( $adr, $par) = @_;
    my $ret;
    #
    # read the status, e.g.: 428A0B0C0H05J0K0M000N0P1R08S07
    #
    gpib_write( $adr, "U0X");
    my $status = gpib_read( $adr, 30);
    if( $par =~ /^r$/i)    # range
    {
        $ret = substr( $status, 24, 3);
    }
    elsif( $par =~ /^c$/i) # zero check
    {
        $ret = substr( $status, 7, 2);
    }
    $ret;
}
sub set_K428
{
    my ($adr, $value) = @_;
    gpib_write( $adr, $value);
}
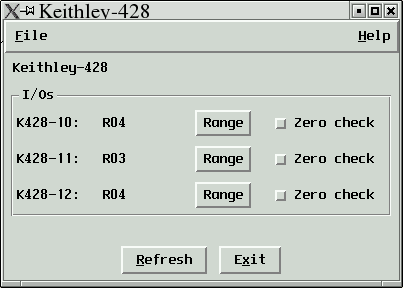
Figure 14.4 shows the resulting widget. Here are some explanations:
foreach my $i ( qw( 10 11 12))
The GPIB addresses of the Keithleys: 10, 11 and 12. |
checkbutton => { ...}
The checkbutton widget has a name that describes it and 2 functions ( get_on(), get_off())
that are invoked, if the button changes its state. In addition there is a
function, get() that returns the current state.
|
selectbutton => { ...}
A selectbutton has a name which is displayed on top of a select button and it has a list of items. Each item consists of a name and a function that is invoked, if the name is selected. |
sub { get_K428( $i, "C") =~ /C1/i;}
This is an anonymous function that returns 1, if the output of get_K428( $i, "C") contains C1. Otherwise 0 is returned.
|
label => { ..., get => sub { get_K428( $i, "R");}
|