Next: Path Names Up: Hints Previous: How do I terminate Contents Index
This chapter gives an example of a SPECTRA session. It is assumed that you are logged into hasyl01. The program is started by:
hasyl01> spectra
If SPECTRA fails to open the window for the graphics output,
see section ![[*]](crossref.png) for help.
SPECTRA searches the default directory and the login directory
for the startup file spectra_ini.gra and executed it, if
it exists.
for help.
SPECTRA searches the default directory and the login directory
for the startup file spectra_ini.gra and executed it, if
it exists.
SPECTRA has a help which is ordered by topics and sub-topics. It is called by:
SPECTRA> help
SPECTRA displays all topics and prompts for a topic name. If the
user supplies one, a help text is displayed or a
list of subtopics. If no input is supplied, help is finished.
There is a verb apropos which scans the help file for a search string and displays the occurences, e.g.:
SPECTRA> apropos fio
The command:
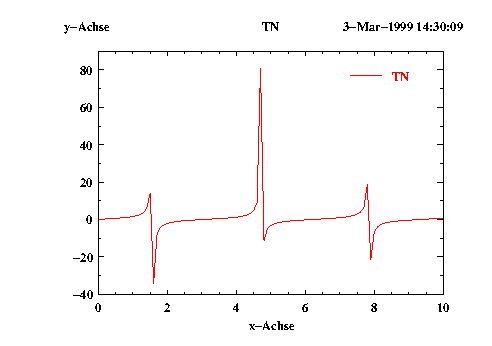
SPECTRAcreates a SCAN type GQE (graphic queue element) which consists of 101 pairs of x- and y-values.>create tn 0 20 100
SPECTRA>set tn/colour=2
SPECTRA>calc tn = tan(tn)
SPECTRA stores all data in an internal queue. The contents of the queue is displayed by default. The verb show displays the queue explicitly. The first column of the display contains a number which identifies a particular GQE. This number is internally stored in an array called book. The next column tells you which type of queue element it is. The name follows and in case of SCANs the size of the data block ( used/allocated). Tn is stored in slot number 1. There can be only one SCAN in a slot, but several lines of text and a CONST queue element, which defines the graphical layout. By default, you get four lines of text: The date, the title and the descriptions of the axes. They have the same slot number, but different sub-indices. And also by default, you get a CONST GQE in slot number 0 named layout. CONST GQEs store those graphical attributes that are common to all or most of the displayed SCANs: Tic mark size and position, grid, etc. The CONST of slot o applies to all SCANs, that have no layout on their own slots. That means: If sa SCAN needs a special treatment, copy the layout from slot 0 to the slot of the SCAN and change it.
The following commands create a TAG GQE for the SCAN and let everything be displayed in the graphics window. See the result in section 3.5. The TAG is in the upper right corner of the viewport, the short line followed by 'TN'.
SPECTRA>create/tag tn
SPECTRA>display
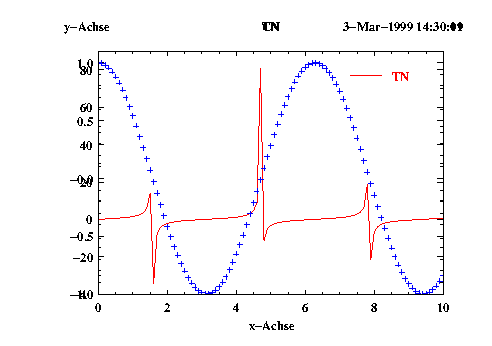
A second SCAN GQE is created:
SPECTRABoth SCANs are displayed on top of each other, see section 3.5 The /primitive qualifier selects line, marker, histogramm, etc., /type chooses between solid or dotted lines or different marker types.>create cn 0 10 100
SPECTRA>calc cn = cos(cn)
SPECTRA>set cn/colour=4/primitive=1/type=2
SPECTRA>display
If you have more than one spectrum in the queue and you do not want to display all of them at the same time, you can explicitly specify, what you want to see:
SPECTRA> display 1
Or you can mark the queue elements which you want to keep
hidden:
SPECTRAThese two commands have the same effect as the previous one. Enter activate to make the entire queue contents active again.>deactivate 2
SPECTRA>display
You can put data to different portions of the screen by changing the viewport limits:
SPECTRA> change tn
This command invokes a full screen menu for the
graphical attributes of tn.
The cursor is moved through the items by KP8 to move up,
KP2 to move down, KP4 to move left and KP6 to move right (KPn refers
to the numeric keypad keys).
You can change the values of a toggle field (e.g.: colour)
by placing the cursor on top of it and use the
right-arrow and left-arrow keys to select one of the different options.
The viewport limits are at the bottom of the screen. The values have to be in the range from 0 to 1. Change the limits and see the effect with a display command. If you want to go back to the show list, say:
SPECTRA> return
The second way to define a viewport is the locator. The command:
SPECTRA> locator
activates the cursor. You have to enter two points to define
a viewport -- the lower left corner and the upper right corner.
Move the gin-cursor to the desired positions and press  ret
ret>.
The third way to change the viewport limits is a SET command, e.g.:
SPECTRAThe result is displayed in section 3.5. The /at qualifier is a very efficient way to place SCANs on the graphic screen. The meaning of (2,1,2,1) is: Divide the screen into a grid of 2 columns and 1 row and put the selected SCAN into position (column 2, row 1).>set tn/at=(2,1,1,1)
SPECTRA>set sn/at=(2,1,2,1)
SPECTRA>display
The set command can also change each viewport parameter individually, e.g.:
SPECTRA> set tn/x_min_view=0.1
Notice that the TAGs and TEXTs stay with the SCANs after the viewport has been changed. This is because SCANs define viewports. The coordinates of TEXTs or TAGs that belong to a SCAN are measured with respect to the viewport of the SCAN. If you have TEXT or TAG which does not belong to a SCAN, put it into slot number 0.
You can define the symbols PF1, PF2, PF3, PF4, KP_ENTER, KP_MINUS, KP_PERIOD, KP_COMMA, KP0, KP1, KP3, KP5, KP7 and KP9 ( all keypad keys except those which are used in CHANGE to move the cursor). Pressing these keypad keys has the effect that SPECTRA tries to translate the symbol that corresponds to the pressed key and if it succeeds, executes the value of the symbol as a command. It is convenient to have the following symbols defined:
SPECTRAPF1 and PF2 are meaningful only during change, KP_ENTER works also while viewing the queue with show.>PF1 = NEXT
SPECTRA>PF2 = BACK
SPECTRA>KP_ENTER = DISPLAY
The command:
SPECTRA> write/fio/x(tn)/y(tn)/y(cn) tn_cn
produces a file named tn_cn which contains three columns.
Later this fio file can be read by:
SPECTRA>read/fio/x=1/y=2 tn_cn tn
SPECTRA>read/fio/x=1/y=3 tn_cn sn
To get a hard-copy of your data on a postscript laser printer, enter:
SPECTRA> post/print/dina4
The file laser.ps is created and sent to the default printer.
The default printer is specified by the symbol printer,
the environment variables PRINTER or LPDEST.
SPECTRA is finished by an exit command.