A Simple Q Scan

Q scans can also be executed as fast scans. All explanations that were given in section 15.4 about scan macros apply for Q scans as well.

In this section we want to demonstrate how a scan is being setup that which is a little bit more complicated than a simple fast scan:

ONLINE$>$ scan/q

The menu is displayed in table 8.2.


Table 15.8: Example: Q Scan Menu
 
                            ----- Q Scan -----
   SPECTRA>  |                                                            |
   A-Move           Qx:            Qy:                Qz:
-------------------------------------------------------------------------------
   Position:        0              0                  0.5
   Start:           0              0                  0.5
   Stop:            0              0                  0.6
-------------------------------------------------------------------------------
   N_Points:        100            Sample_time:       0.1
   SSA:             YES
   Auto-return:     (1) YES        Auto Filter        NO
   Scan mode:       Bisecting      Psi-Par.:          0
-------------------------------------------------------------------------------
   Scan_Name:         tst_0013
   Generic Scan Name: tst
   Comment:
-------------------------------------------------------------------------------
   Edit com-files
    <~.prog>before_q_scan.gra                                         NO
    <~.prog>during_q_scan.gra                                         NO
    <~.prog>after_q_scan.gra                                          NO

-------------------------------------------------------------------------------
 PF1 - Start Scan, PF2 - Continue scan, PF4 - EXIT, Space bar to stop move


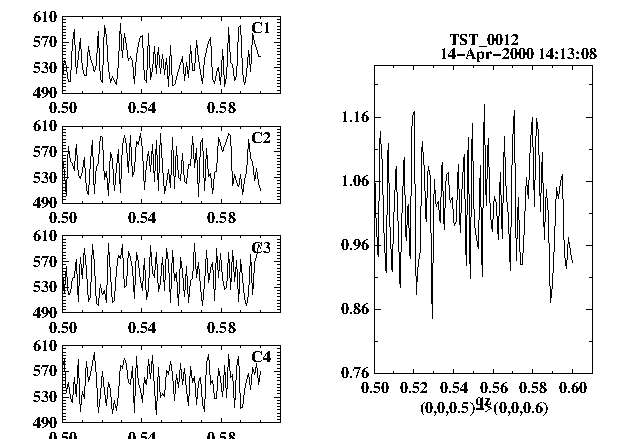
Figure 15.2 shows the graphical output which is generated during the scan.

Figure 15.2: The Online Display of Q Scans
Image q_scan

Table 15.7 shows the contents of the before-file.


Table 15.9: Example: Before_q_scan.gra
 
!
! before_q_scan.gra
!

  deactivate

  c1name = scan_name"_c1"
  c2name = scan_name"_c2"
  c3name = scan_name"_c3"
  c4name = scan_name"_c4"

  copy scan_name c1name
  copy scan_name c2name
  copy scan_name c3name
  copy scan_name c4name

  create/text/string=C1/x=0.95/y=0.85/h_alig=3 c1name
  create/text/string=C2/x=0.95/y=0.85/h_alig=3 c2name
  create/text/string=C3/x=0.95/y=0.85/h_alig=3 c3name
  create/text/string=C4/x=0.95/y=0.85/h_alig=3 c4name

  set c1name/at=(2,4,1,1)
  set c2name/at=(2,4,1,2)
  set c3name/at=(2,4,1,3)
  set c4name/at=(2,4,1,4)

  set scan_name/at=(2,1,2)

  auto/window/x

  scan_timer = t1

  activate scan_name.*


Here are the explanations for this file:

 deactivate
The GQEs which belong to preceeding scans must not be displayed during the current measurement.

 c1name = scan_name"_c1"
The name of the SCAN GQE that stores the counter reading of c1.

 copy scan_name c1name
ONLINE creates scan_name which can serve as a template for other SCANs that store data, like in this example. The size of scan_name has been calculated from the scan parameters.

 create/text/string=C1/x=0.95/y=0.85/h_alig=3 c1name
A TEXT GQE is created that describes c1name.

 set c1name/at=(2,4,1,1) The SCAN c1name is put to the upper left corner of the screen. Precisly: If the screen were divided into 2 column and 4 rows, c1name is placed in column 1, row 1.

The during-file does the measurement, table 15.7:


Table 15.10: Example: During_q_scan.gra
 
!
! during_q_scan.gra
!


do resaco()

sawft( scan_timer) = sample_time

c1name(sindex) = gc(c1)
c2name(sindex) = gc(c2)
c3name(sindex) = gc(c3)
c4name(sindex) = gc(c4)

scan_name(sindex) = c2name(sindex)/c1name(sindex)

auto/y
display


The explanations:

 do resaco()
Resets all counter.

 sawft(scan_timer) = sample_time
Start-and-wait-for-timer. The symbol scan_timer has been created in the before-file. The symbol sample_time is created by ONLINE. It is filled with the value from the menu.

 c1name(sindex) = gc(c1)
The symbol sindex is maintained by ONLINE. It starts at 1 and it is incremented at every during-call. The function gc() reads the counters (get-counts).

Table 15.7 looks familiar. Notice that we may use the output command write/fio/scan because all our data begin with scan_name.


Table 15.11: Example: After_q_scan.gra
 
  if yesno( "Write to disk ")
    write/fio/scan/motor scan_name
  endif

  if yesno( "Postscript ")
    post/nocon/dina4/print
  endif

  Cleanup